%20copy%202-min.png)
Fetch Sports, Leagues, Fixtures & Markets
In this module, you’ll build a module that fetches sports, leagues, fixtures, and markets from the SX Bet API. By the end, you'll have a navigable directory of bettable events, allowing you to drill down from sports → leagues → fixtures → markets.
💡 Why does this matter? This directory is the foundation of your betting bot, allowing you to find the exact market you want to interact with, whether it’s placing a bet, fetching odds, or tracking trades.

How the API Structure Works
To create this directory, requests will be made to a sequence of SX Bet API endpoints:
-
/sports – Retrieves a list of available sports and their sport IDs.
-
/leagues/active – Filters leagues by sport ID to retrieve currently active leagues.
-
/fixture/active – Filters fixtures by league ID to get a list of active matches.
-
/markets/active – Filters markets by event ID (fixture) to retrieve all active markets (moneyline, spread, totals, etc.).
Each layer builds on the previous, and together, they form a navigable structure that the bot will use to make decisions.
Step 1: Create Fetch Sports
Create a program that fetches the sports and their associated ID from the /sports endpoint and displays them in the terminal.
Send the following prompt in a new conversation:
Claude should respond with something like this:

You should already have a folder open. If not, complete module 1.
Step 2: Fetch Sports
1) Select the package.json file from the project directory and add the following line below where it says “version”: “1.0.0”:
.png)
2) Install Dependencies:
Open your terminal in Visual Studio Code with the following keyboard shortcut:
-
Windows/Linux: Ctrl + Shift + ~
-
Mac: Cmd + Shift + ~
Then, paste this command into the terminal and press enter to install the node-fetch package:

3) Create the Program File
Inside your project folder, create a new file and name it fetchSports.js. This is where you'll store your code to fetch sports data.

4) Update the fetchSports.js file
Select the fetchSports.js file from the project folder, and paste in the full code provided by Claude, then save the file.
-
Windows/Linux: Ctrl + s
-
Mac: Cmd + s
5) Run the Program
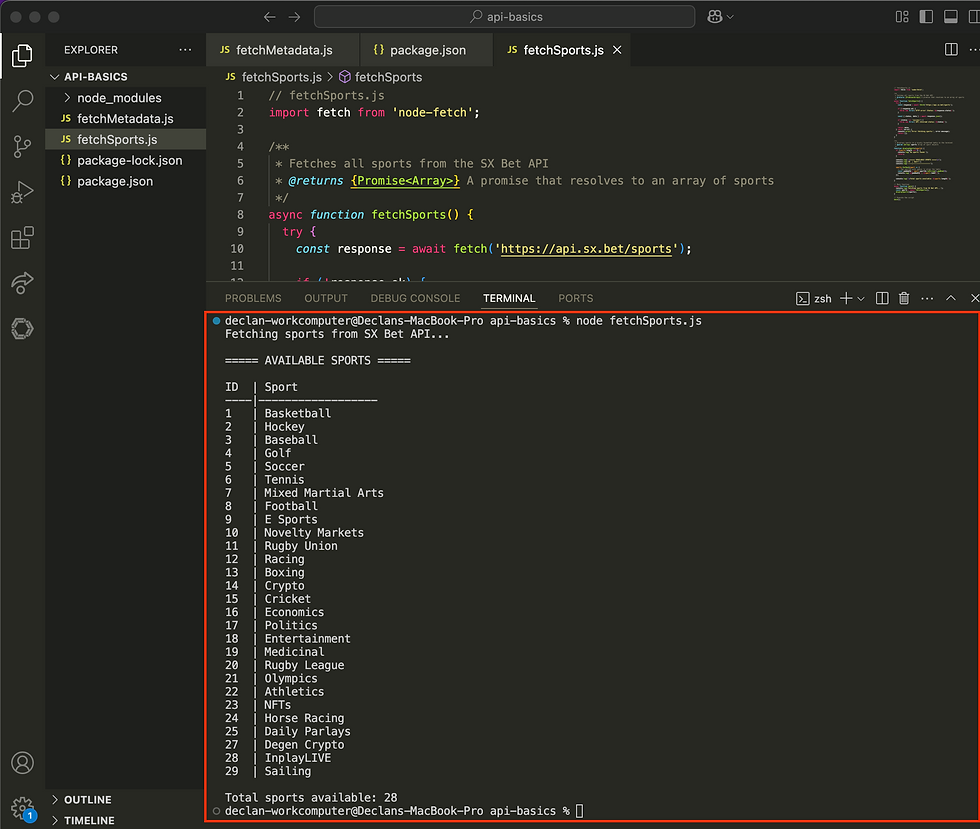
Open the terminal, enter the following command and press enter:
You should see a list of available sports printed to the terminal, with each sport's name and corresponding sport ID.
Step 3: Fetch Active Leauges
Now that the script fetches available sports, the next step is to add functionality to the program that will allow you to select a sport from the terminal and retrieve its active leagues.
1) Send the following prompt your existing conversation:
Claude will respond with an updated program; copy that to your clipboard.
2) Update the fetchSports.js File
Select the fetchSports.js file from the project folder directory, select all the code currently in the file, and delete it. Then, paste in the new code from Claude and save the file.
3) Run the Program
Open the terminal, enter the following command and press enter:
After selecting a sport from the terminal, you should see the active leagues for the selected sport.

Step 4: Fetch Active Fixtures
Now that the script fetches available sports and leagues, the next step is to add a feature to the program that will allow you to select one of the leagues from the terminal and retrieve its fixtures.
To refine the results returned from your request, update the prompt to request the program displays:
-
Fixtures sorted chronologically
-
Only fixtures scheduled within the next 2 days
1) Send the following prompt your existing conversation:
Claude will respond with an updated program; copy that to your clipboard.
2) Update the fetchSports.js File
Select the fetchSports.js file from the project folder directory, select all the code currently in the file, and delete it. Then, paste in the new code from Claude and save the file.
3) Run the Program
Open the terminal, enter the following command and press enter:
You should now see upcoming fixtures (matches) in the terminal after selecting a league:
.png)
Step 5: Fetch Active Markets
Now that the script fetches available sports, leagues, and fixtures, the final step is to add a feature to the program that will allow you to select one of the fixtures from the terminal and retrieve its active markets.
To refine the results returned from your request, update the prompt to request the program to only return mainline markets. Many additional filters can be found on the Get Active Markets section of the SX API Documentation
Send the following prompt in your existing conversation:
Claude will respond with an updated program; copy that to your clipboard.
2) Update the fetchSports.js File
Select the fetchSports.js file from the project folder directory, select all the code currently in the file, and delete it. Then, paste in the new code from Claude and save the file.
3) Run the Program
Open the terminal, enter the following command and press enter:
You should now see active mainline markets in the terminal after selecting a fixture:


